PostgreSQL

PostgreSQL and DigitalOcean
DigitalOcean, in addition to its inexpensive and excellent Kubernetes offering, has just launched managed databases. Currently, they offer PostgreSQL, but
are planning to expand to MySQL.
Of course, you don't have to use their PostgreSQL offering, as you could just use the Docker Hub image for PostgreSQL, and run Postgre from inside a container. And that is
a perfectly reasonable way to go.
But then you would have the added work of
maintaining your PostgreSQL server. DigitalOcean's offering does some of that for you. So they offer:
- Fully managed PostgreSQL databases
- Free daily backups with point-in-time recovery
- Standby nodes with auto-failover
I don't anticipate DigitalOcean offering a similar service for SQL Server. Rats.
Therefore, I thought I would show how to target a PostgreSQL database from a .NET Web API project.
The basic assumption is that if you are using .NET, there is a reasonable chance you are currently targeting SQL Server.
How To Setup A .NET Web API With PostgreSQL
To get the show on the road, I am going to create a HelloWorld .NET Web API that uses PostgreSQL for the backend datastore.
My setup: I am running
Windows 10 with Visual Studio 2017. I have installed PostgreSQL (localhost) running on the standard port 5432,
and have created a login JoeUser with password HardToGuessPassword. I am using pgAdmin4 as the gui to access the PostgreSQL server.
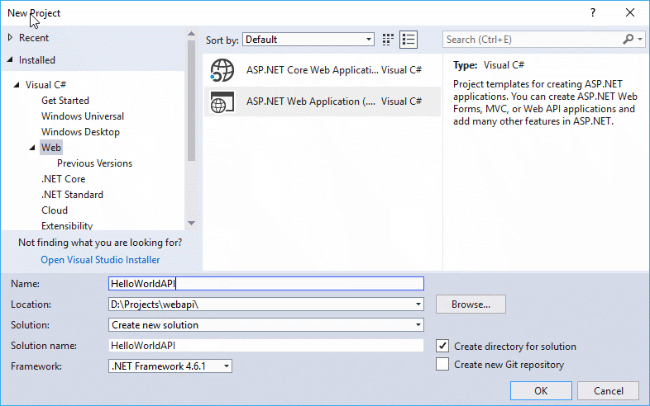
Step 1.
In Visual Studio 2017, create a new ASP.NET Web Application project, HelloWorldAPI


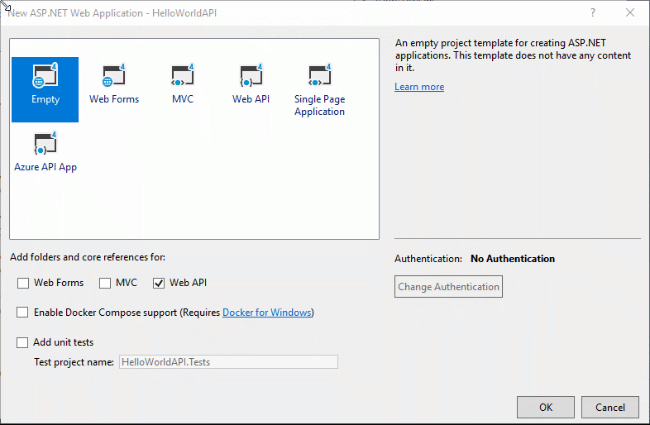
Step 2. Select the Empty project template, but be sure to select the Web API checkbox.

Click OK.

Click OK.
Step 3. Let's add the very useful Swagger. Right click the project in Visual Studio, and then click on "Manage Nuget Packages…"
Step 4. Search for "swashbuckle" under the browse tab. Select Swashbuckle by Richard Morris and install it in your project.
Step 5.
Now, let's set Swagger to startup automatically.
Right click on the project, select properties, and select the
Web section of the properties page.
Check the Specific Page radio button, and enter swagger in the textbox, and save.
Now Swagger will automatically be shown.


Step 6.. Verfiy: Press F5, or Ctrl F5, and you should get a swagger start page. There are no API methods yet for Swagger to consume, so I add that next.
Step 7.
Since we want to use Entity framework, I have to add a class to represent an entity. Right click on the models folder, and add a new class:
Books.cs
Books.cs
                 using System.ComponentModel.DataAnnotations;

                 namespace HelloWorldAPI.Models
                     {
                     public class Books
                       {
                        [Key]
                        public int Id { get; set; }

                        public string Title { get; set; }

                        public string Author { get; set; }
                       }
                     }
(Please note: In an actual real word, non-Hello World API, a DTO(s) would be used here. Using an entity for a view model is brittle...Having said that,
it has the advantage of keeping this article small, and quickly getting to the PostgreSQL part.)
Step 8.
Build the solution, and then right click on the Controllers folder and add a Web API 2 controller
With actions using Entity Framework:


Step 9.
In the resulting dialog, select our Books class,
and click the plus (+) sign to add a context. Prefer async methods (its async all the way down!)
so check the "Use aysnc controller action" checkbox.

Finally click Add.

Finally click Add.
Step 10.
After click "Add" in the last step, Visual Studio will generate and add boilerplate code to our project.
In particular, the web.config should now show a connection string to a (local)\MSSQLLocalDB Data Source and a mdf file:

As we don't want to use SQL Server, but are going to use PostgresSQL,we will PostgreSQLify that connection string . But first, we have to add a 3rd party library that will let .NET target PostgreSQL.

As we don't want to use SQL Server, but are going to use PostgresSQL,we will PostgreSQLify that connection string . But first, we have to add a 3rd party library that will let .NET target PostgreSQL.
Step 11.
In the package manager console, enter:
This will install the EntityFramework6.Npgsql package that is needed for PostgreSQL.
In web.config change the connection string to one that contains our PostgreSQL userid (JoeUser) and the user password (HardToGuessPassword). Also, the standard PostgreSQL port of 5432 is being used...:
Install-Package EntityFramework6.Npgsql -Version 3.2.0
This will install the EntityFramework6.Npgsql package that is needed for PostgreSQL.
In web.config change the connection string to one that contains our PostgreSQL userid (JoeUser) and the user password (HardToGuessPassword). Also, the standard PostgreSQL port of 5432 is being used...:
           <add name="HelloWorldAPIContext"
                connectionString="Server=127.0.0.1;Port=5432;User Id=JoeUser;
                Password=HardToGuessPassword;
                Database=HelloWorld;"
                providerName="Npgsql" />
Step 12.We are almost there...Finally, we need to add a new Npgsql class:
    using Npgsql;
    using System.Configuration;
    using System.Data.Entity;

	namespace HelloWorldAPI
	{
	public class NpgSqlConfiguration: DbConfiguration
	   {
	   public NpgSqlConfiguration()
	      {
	      var name = "Npgsql";

	      SetProviderFactory(providerInvariantName: name,providerFactory: NpgsqlFactory.Instance);

	      SetProviderServices(providerInvariantName: name,provider: NpgsqlServices.Instance);

	      SetDefaultConnectionFactory(connectionFactory: new NpgsqlConnectionFactory());
	      }
	   }
	}
Step 13.
Now we can enable migrations.
In the package manager console, type:
Enable-Migrations -Force
Enable-Migrations -Force
Step 14. In the package manager console, type
Add-Migration 'initial migration' and press enter.
Step 15. Finally, press F5 (or ctrl F5) to launch the API and Swagger to test it.
Step 16. Hopefully, everything works (on your machine!) and you should be able to post a book to the API and have it
saved in PostgreSQL:


Step 17. Verify that indeed you are saving to PostgresSQL (and not SQL Server) by viewing the database in pgAdmin4:


 Cogitations on Physics, Math, and Computers